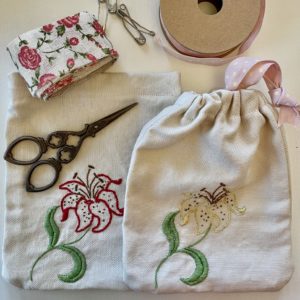
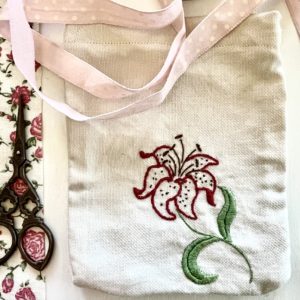
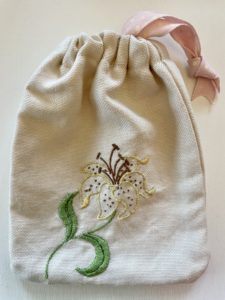
Making some new drawstring bags were just the ticket to help me do a warm up on the sewing machine after not using it for some time. These two bags are made from a small vintage table cloth that had a lily embroidered in each corner. Originally bought to make into a small curtain for a window in our cottage, the layout of the embroidery pattern on the tablecloth didn’t quite work for a curtain.
These bags are handy to store computer cords in, a small gem collection, craft works in progress, items you wish to keep separate in your suitcase, a good substitute for wrapping paper, or in this case the bags are being sent to a felt artist who will store individual pieces that she is working on.
These bags are an easy project for a beginner, don’t be put off by sewing French seams, it is only a sewing term describing a few easy steps, nothing too technical. Taking that little extra step and creating French seams stops whatever contents you put in the bag from catching on fraying fabric that inevitably happens when often lifting things in and out of a small bag unless overlocking is used.
*Liliana has been sewing since she could sit on my knee and help me navigate the fabric through the machine (her hands were never close to the needle), she graduated to being able to reach the sewing machine peddle when she could then was trusted with using the sewing machine when she was confident for that next step. Each step of the way I gauged based on her age, stage of development and capabilities. Sometimes it was years between advancing to the next step towards being able to use the sewing machine independently. When introducing Lil to a project like this we would initially make it together then she would go ahead and make more small bags by herself. Working together, explaining each step, patience, understanding when a mistake is made, allowing for learning and confidence building. All important life skills to learn as well as the sewing.
~ How to make these drawstring bags ~
What you will need:
Fabric: Preferably linen or cotton. Use what you have, a fabric offcut from a previous project, the stain free end of a table cloth or pretty tea towel that you can no longer use, a vintage doily or pillowslip. Fabric like this is too good to throw out or use in the rag bag. Who are you making the bags for? Consider their colour palette, interests and what they’ll use the bags for.
Scissors: Scissors that will cut fabric.
I also use a small pair of embroidery scissors when trimming excess cotton on the ends.
Thread: That matches the fabric. Contrasting cotton shows wobbly sewing stitches & your sewing mistakes easily.
Drawstring: Ribbon, fabric tape or cord.
The Pattern:
On a piece of paper measure a rectangle 19.5cm x 25cm and round off the corners on one end. The rounded edge will be at the bottom of your bags. You will need a sewing machine.
Step 1. Pin your pattern to 2 pieces of fabric and cut out. A back & a front.
Step 2. With wrong sides together sew hem 0.5cm from the edge on the two long sides & the end with the rounded corners. Reinforce the stitching if the intended contents will be heavy, that means sew back over the first row of stitching you just did. Make sure there are no loose cotton threads along the edges of your fabric.
Step 3. Turn your fabric inside out. You now have the right sides together. Sew a 1cm hem. Reinforce stitching if the intended contents will be heavy. You just made a French seam. Not tricky at all.
Step 4. Now to make the channel the draw string ribbon is threaded through. Fold the top of your bag over 4 cm. Tuck in 0.5cm to create a neat edge to sew around. Starting on the right hand side at the back of the bag sew along the edge leaving a 2cm gap for you to thread through the ribbon on the end of your safety pin.
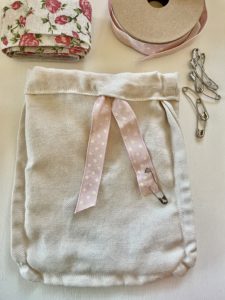
Step 5. Cut your ribbon to length approx. 55cm. Thread a bobby pin on the end of your ribbon. Thread it through the drawstring channel at the top of the bag that you just made.
Step 6. Trim the ribbon edges to prevent fraying, knot your ribbon close to the end. Turn your bag right side making sure you push the fabric in the corners out to give the bag the correct shape. If you use an iron you may wish to give the newly finished bag a light press.
Congratulations. You have just made yourself a new sweet little bag!
Let me know if you make some, they really are so handy. Happy crafting and sewing.
Take precious care, Jude x
Fabric Bags
September 3, 2021

comments
share